 Facebook, my Facebook, wherefore art thou, Facebook?
With Facebook having introduced quite a few changes to business pages, most of us are scratching our heads as to how to make the best use of them.
Or “get up to speed,” if you’d prefer buzzword bingo terminology.
Image: Massimo Barbieri via Flickr, CC 2.0
While a lot has already been written about how to deal with Facebook’s latest changes, here are seven ideas on making your business page just a tad better and easier to use.
I touched on the first three over at BNET yesterday, namely:
1. De-select the option to always use Facebook as your business page even when you’re logged in as yourself.
The reason I suggest this is, as I wrote on BNET:
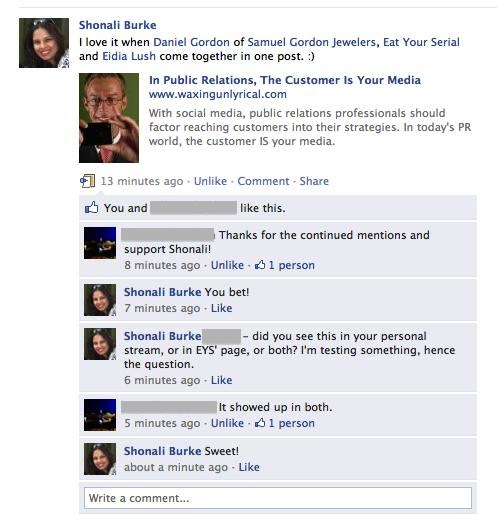
By giving yourself the option to post to your business page as yourself, you are increasing the chances that your post will show up both in your friends’ personal news feed, as well as that of anyone who’s “liked” your page.
And if you tag a business or another person in your post, then they’ll definitely see it (don’t overdo the tagging, some people don’t like it and Facebook limits how many people/pages you can tag in a post any way).
And the likelihood that they will engage is higher if they can see the post… right?
How: Click on “edit page” at the top right of your page, and then navigate to “your settings,” which is the first option in the left menu. The rest is easy.
You can see how this worked (it did!) when I tested it yesterday:
2. Use Hyper Alerts instead of Facebook’s new notification system.
I haven’t written about Hyper Alerts per se, but it’s absolutely genius.
It does exactly the same thing as Facebook’s notification system, but, as I wrote on BNET:
- You can decide how often you want to get the emails;
- You can set these up for as many pages as you’d like; and
- You get a very cool email that also includes a screen shot of the comments, which is much more pleasing to the eye than a plain text email.
So consider de-selecting the Facebook option (again, in the “your settings” option as in #1 above); in fact, I’d suggest disabling alerts for any pages you manage.
Bonus tip: This is also a very smart way to keep on top of activity on competitors’ pages. There’s no way you’d be able to do that unless you somehow managed to be a Page Admin for them.
In fact, when Facebook first made these changes, I got an email notification from Hyper Alert that same day – in fact, I think it was probably just a couple of hours later – telling me why Hyper Alerts is still a better option.
Color me impressed.
3. Schedule posts and updates to your page via HootSuite or Amplify.
The one thing that Facebook has not added as yet is the ability to schedule posts to one’s profile or page.
Before you hit me over the head, telling me you hate auto-updates… lemme say this: there are auto-updates, and there are auto-updates.
I think it’s fine to schedule certain types of updates; for example, if there are certain blog posts you want to promote (for yourself as well as those of people you respect), and so on.
It’s not fine, IMHO, to send out auto-DMs when someone starts following you on Twitter. I mean, really?!
Can you say, “La Cucaracha”?
So until Facebook comes up with a solution, schedule your posts through HootSuite or Amplify, both of which let you schedule any number of updates ahead of time.
While you can’t tag your friends or fans directly as you can on Facebook, this will still take a bit of the load off.
However, comma, watch out for:
- Scheduling too many updates, too close together
- Not posting in real time at all – you gotta do that too!
Those were the three tips I posted on BNET.
And now, the rest of the story! (Heck, this is why you read WUL, right?)
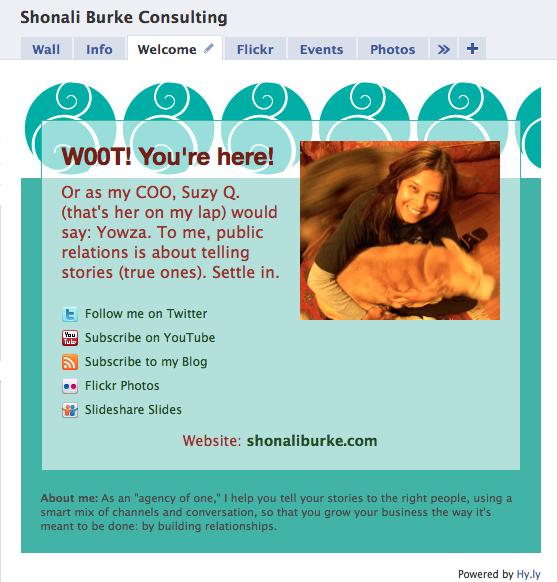 4. Use Hy.Ly’s welcome app for your welcome tab, er, link.
(‘Cos now all the tabs are menu items on the left side of your page).
If, like me, you are clueless about FBML, iframe and other such developer goodness, don’t worry.
You can still use Hy.Ly’s Facebook welcome app to create a nice landing page for first-time visitors and non-likers to your Facebook page.
Since this was one of the concerns Hy.Ly founder Munish Gandhi originally had, I was relieved to see that this still works.
So much easier than messing around with iframes and what not.
I’ve said it before, and I’ll say it again: I think Hy.Ly is genius.
5. Create at least one photo album for your page consisting of business-related photos.
Before Facebook dumped its changes on us, albums connected with your page certainly had their own tab, but they didn’t hit you in the face when you went to your page.
Now they do.
And just like your profile page, the photos show up in a strip at the top of the page.
This is where, I assume, you do not want that pic of you looking slightly bleary at the holiday party being front and center.
In the context of your holiday party album it looked fine, but probably not when taken in isolation.
The easiest way to make sure that you have a few decent photos is to… make sure you have a few decent photos.
So create a new album, or add a few more in to an existing one, and then just ‘x’ out any photos you don’t like in the strip on your business page (just like you would on your personal profile).
Note: if you tag anyone in the photos (including yourself) these will show up in their profiles as well. So once you’ve done this, check your personal profile to ensure you’re ok with the photos being displayed there as well.
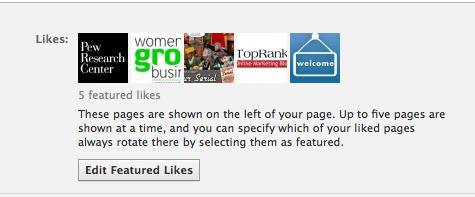
6. Select a couple of the other businesses you’ve Facebook “liked” as featured likes.
Much as we’d like to think we’re judged on our own merits (or demerits), we’re not.
We’re often judged by how much of ourselves we put on display. In Facebook World, that means who and what you’re “liking,” among other things.
With the new page layout, because your page’s fans are no longer featured with their avatars, as they used to be, your “liked” pages get moved up a bit.
This is not a biggie per se, but since your “liked” pages are featured at random, it’s a good idea to fix at least a couple of them, so that you can try to get the halo effect by association, if you know what I mean.
You can do this by going into “edit settings” and then navigating to “featured” in the left menu.
Then, simply select a few of the pages you always want to show up, up to a maximum of five.
Zzzzimple.
7. Adjust your Page’s news feed settings.
Remember how some folks were cranky about Facebook’s news feed filters, which, by default, show you posts from the folks and pages you “interact with the most”?
What? You were one of them? Oups. Sorry!
Anyhoo, you can change that pretty easily on your personal profile, as All Facebook explains.
You can do the same thing for your business page, if you’re using Facebook as the page.
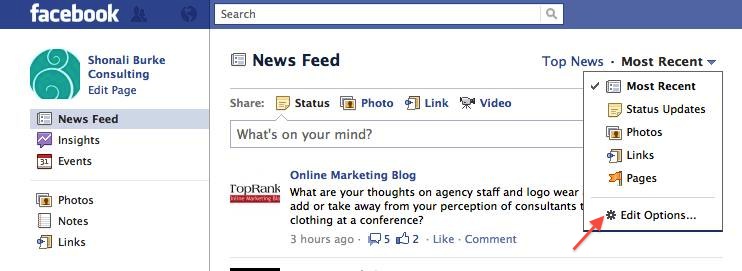
Once you have toggled to using Facebook as the page, click on “home” and then on “news feed,” and then on the drop-down arrow that appears when you click on “most recent.”
And then, the steps are practically identical to changing settings on your personal news feed.
While I’m glad I found a way to do this, I’m still trying to figure out what the point is, because for the most part, the Wall is what people see when they visit your page.
I’m starting to think it’s so that, if you’re logged in as the page and not yourself, you can try to up your engagement with posts you might not see otherwise – just as you could do on your personal page.
In any event, I don’t see why Facebook should dictate which posts show up when, so I changed those settings as above.
There you go.
Seven steps to a slightly better Facebook for business experience.
Did this help? Do you have more tips to share? And what’s your thought on the point of #7 above?


![[EVENT]: PR Hacks for Small Biz (online)](https://shonaliburke.com/wp-content/uploads/2021/06/FB-Ad-1200x800-01-01-01-Copy-500x383.jpeg)





[…] to reflect your brand. See what people have said about Hy.ly lately at Social Media Mentoring and Waxing UnLyrical. Hy.ly has been fluid with the changes Facebook has been making and is dedicated to always being […]
[…] to reflect your brand. See what people have said about Hy.ly lately at Social Media Mentoring and Waxing UnLyrical. Hy.ly has been fluid with the changes Facebook has been making and is dedicated to always being […]
Shonali! I love #4…I’ve been monkeying around with the FBML tab/page a bit and HATE it. Have just read your earlier post about Hy.Ly: A Killer Facebook Welcome App and will be heading over to Hy.ly now. Thank you, thank you for clear tips and steps to creating a better FB biz page.
Just put my landing page up (took about 1/2 and hour) – very easy! See what you think…may take the video off, but for now, it’s a ton better than what I had! Thanks again!
http://www.facebook.com/AllisonDevGroup?sk=app_109486035783059
@EricaAllison I LOVE your page!
@EricaAllison PS – I’m so glad I could write something useful for you. :)
[…] Seven Steps To A Better Facebook Business Page – by Shonali Burke, waxingunlyrical.com […]
[…] Why: Because I completely agree! […]
I have used HyperAlerts and Facebook Notifications, and I find that Facebook is much faster, at least for me. HyperAlerts has been a day or more later. That’s too late for me for comment notification! :)
@Mary_Fletcher_Jones Mary, did that happen even when you selected the “asap” option?
@Shonali I don’t know…let me check! that might solve it…
Shonali, these are great tips! As the poster child for all things technical, I have spent the last few weeks trying to get my company’s fan page off the ground. It’s finally up and running (www.facebook.com/cgicommunications) but now, the challenge is in getting people to go to it. I will be implementing several of your ideas to see if they make a difference.
One question I have re: #1: I’m the page admin for our site, but I didn’t want my personal profile attached to it, so while there is a profile, it doesn’t have anything in it and the person’s name won’t connect anyone with the company, so how do you suggest those of us in that type of situation handle that?
Thanks again!
Robin
P.S. I posted your article about the customer being the media to our page this morning. More great stuff!
@CGI_PR_Girl Hey, Robin, thanks so much and I very much appreciate you sharing the other post on your FB page too.
If I understand your question correctly, you don’t want your personal profile/avatar showing up as an “admin” on the business page, right? I think you’re safe, because from what I can tell, the “Admin” section on a business page is only visible to admins any way. For example, when I just went to your page, I couldn’t see anything under “Admins.”
If you also don’t want your personal profile showing up when you post to your page, then you can do one of two things: 1, either keep the option to always use Facebook as the business page even when logged in as yourself (i.e. disregard my suggestion), or 2, toggle to “use FB as <PAGE>.
The disadvantage to the second option above (I just tested this before replying to you), is that if you use FB as your page, you won’t be able to tag anyone of your friends – the only things you can tag are other pages. That is, assuming you want to be able to tag people. So if that’s your goal, then I’d suggest keeping the FB option checked, especially if you don’t want Page posts showing up in your personal profile.
Did that help, Robin?
@Shonali Yes, it did. Thanks so much!
@CGI_PR_Girl Oh, phew!
Thanks for the mention, Shonali! Hy.ly loves helping small businesses with useful Facebook apps :) ^af
@Hy_ly My pleasure. The truth is, if your app sucked, there’s no way I’d be writing about it. :)
Great tips! I especially like #6. After all, we are judged by who we associate with!
@TabithaEdwards “Birds of a feather,” eh? Thanks, Tabitha!
Excellent tips Shonali!
[…] This post was mentioned on Twitter by John Haydon, Shonali Burke, The Baum Group, Jared Lenover, Milston Consulting and others. Milston Consulting said: Great tips, especially. Hy.ly tip RT @johnhaydon: RT @shonali: Seven Steps to a Better Facebook Page http://ow.ly/3XSys #smc4np […]